파일 정보

import java.io.File;
import java.text.SimpleDateFormat;
import java.util.Date;

public class Ex001_File {

	public static void main(String[] args) {
		String appDir = System.getProperty("user.dir");
		// System.out.println("현 작업경로 : " + appDir);

		String pathname = appDir + File.separator + "user.txt";
		// File.separator : 윈도우즈는 \, Mac이나 리눅스는 /
		// System.out.println(pathname);

		File f = new File(pathname);
		// exists() : 폴더 또는 파일이 존재하면 true, 없으면 false를 반환
		if (!f.exists()) {
			System.out.println(pathname + " 파일은 존재하지 않습니다.");
			System.exit(0);

		}

		try {
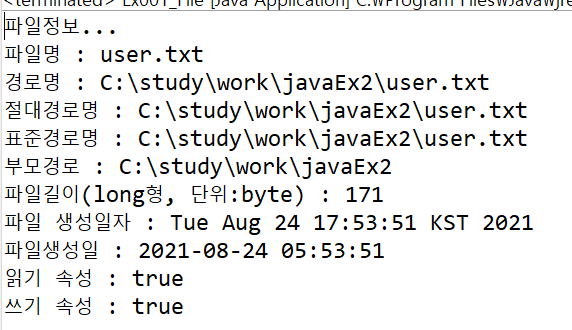
			System.out.println("파일정보...");
			System.out.println("파일명 : " + f.getName()); // 파일명.확장자
			System.out.println("경로명 : " + f.getPath()); // c:\폴더\파일명.확장자
			System.out.println("절대경로명 : " + f.getAbsolutePath()); // c:\폴더\파일명.확장자
			System.out.println("표준경로명 : " + f.getCanonicalPath()); // c:\폴더\파일명.확장자
			
			System.out.println("부모경로 : "+f.getParent()); // c:\폴더
			System.out.println("파일길이(long형, 단위:byte) : " + f.length());
			// f.lastModified() : 1970.1.1부터 파일생성일까지를 ms단위로 환상하여 반환
			System.out.println("파일 생성일자 : " + new Date(f.lastModified()));
			SimpleDateFormat sdf = new SimpleDateFormat("yyyy-MM-dd hh:mm:ss");
			String s = sdf.format(new Date(f.lastModified()));
			System.out.println("파일생성일 : " + s);
			System.out.println("읽기 속성 : "+f.canRead());
			System.out.println("쓰기 속성 : "+f.canWrite());
			
		} catch (Exception e) {
			e.printStackTrace();
		}

	}

}

System.getProperty("user.dir");으로 현재 작업경로를 알 수 있다.

File.separator : Windows는 \, Mac이나 Linux / 을 나타낸다.


f.exists() : 폴더 또는 파일이 존재하면 true, 없으면 false를 반환

System.exit(0) : 프로그램 종료


File클래스를 통해 파일명, 경로, 절대경로, 표준경로, 파일길이, 생성일자 ... 등을 알 수 있다.


파일 삭제 (1) - 한 개만 삭제

import java.io.File;

public class Ex002_FileDelete {

	public static void main(String[] args) {
		String appDir = System.getProperty("user.dir"); // 현재 작업 경로
		String pathname = appDir + File.separator + "test.txt";

		File f = new File(pathname);

		if (!f.exists()) {
			System.out.println(pathname + "파일이 존재하지 않습니다.");
			System.exit(0);
		}

		boolean b = f.delete();
		// 파일 또는 디렉토리 삭제
		// 한번에 하나의 파일 또는 디렉토리만 삭제 가능
		// 디렉토리는 비어 있어야 삭제가 가능
		if (b) {
			System.out.println("파일이 삭제 되었습니다.");
		} else {
			System.out.println("파일 삭제가 실패 했습니다.");
		}

	}

}

f.delete(); 메소드

- 파일 또는 디렉토리를 삭제한다.

- 한번에 하나의 파일 또는 디렉토리만 삭제가 가능하다.

- 디렉토리는 비어 있어야 삭제가 가능하다.


파일 삭제(2) - 해당 경로에 있는 모든 파일 삭제

import java.io.File;

public class Ex007_FileRemove {
	public static void main(String[] args) {
		String pathname = "C:"+File.separator + "ex";
		FileManager fm = new FileManager();
		
		fm.removeDir(pathname);
		
		System.out.println("디렉토리 또는 파일 삭제 완료...");
	}
}

class FileManager {
	/**
	 * 파일 또는 폴더 삭제 (하위 폴더 및 모든 파일도 제거 되므로 조심해라...)
	 * @param pathname 삭제할 폴더 또는 파일
	 * @return		   폴더 또는 파일 삭제 여부
	 */
	public boolean removeDir(String pathname) {
		boolean b = false;
		
		try {
			File f = new File(pathname); 
			if(f.isDirectory()) { // 폴더이면 속으로 들어가라
				removeSubDir(pathname);
			}
			
			b = f.delete(); // 폴더가 아니면 삭제
			
		} catch (Exception e) {
			e.printStackTrace();
		}
		
		return b;
	}
	
	private void removeSubDir(String pathname) {
		File[] ff = new File(pathname).listFiles();
		try {
			if(ff.length == 0) // 자식이 없는 경우
				return;
			
			for(File f : ff) {
				if(f.isDirectory()) { // 폴더면 또 안으로 들어가기
					removeSubDir(f.getPath()); // 재귀 호출
				}
				f.delete();
			}
		} catch (Exception e) {
		}
	}
	
}

f.delete() 폴더가 아니면 삭제하고 자식이 없는 디렉토리일시에도 삭제한다.


디렉토리 일시 안으로 들어가서 파일들을 하나씩 다 삭제하는데, 다시 또 디렉토리면 재귀 호출을 통해 해당 경로에 있는 디렉토리 안으로 들어가서 또 파일을 하나씩 다 삭제한다.


파일 리스트

import java.io.BufferedReader;
import java.io.File;
import java.io.InputStreamReader;
import java.text.SimpleDateFormat;
import java.util.Date;

public class Ex004_FileList {
	public static void main(String[] args) {
		BufferedReader br = new BufferedReader(new InputStreamReader(System.in));
		String s;
		
		try {
			System.out.print("경로 ? ");
			s = br.readLine();
			dirList(s);
		} catch (Exception e) {
			e.printStackTrace();
		}
	}
	
	public static void dirList(String pathname) {
		// 폴더에 존재하는 폴더 또는 파일 리스트 확인하기
		File file = new File(pathname);
		
		if ( ! file.exists()) {
			System.out.println("디렉토리가 존재하지 않습니다.");
			return;
		}
		
		if(! file.isDirectory()) {
			System.out.println("디렉토리가 아닙니다.");
			return;
		}
		
		File [] ff = file.listFiles();
			// 폴더에 존재하는 모든 폴더 또는 파일에 대한 File 객체를 반환
		try {
			SimpleDateFormat sdf = new SimpleDateFormat("yyyy-MM-dd hh:mm:ss");
			String s;
			for(File f : ff) {
				s = sdf.format(new Date(f.lastModified()));
				if(f.isFile()) {
					System.out.print(f.getName()+"\t");
					System.out.print(s+"\t");
					System.out.println(f.length()+"bytes");
				} else if(file.isDirectory()) {
					System.out.println("["+f.getName()+"]...");
				}
			}
		} catch (Exception e) {
			e.printStackTrace();
		}


	}

file.exists() 입력한 경로에 파일/디렉토리가 존재하지 않으면 false를 반환한다.

file.isDirectory() 입력한 경로가 디렉토리면 true, 아니면 false를 반환한다.

file.listFiles() 입력한 경로에 존재하는 모든 파일, 디렉토리를 파일 배열로 반환한다.


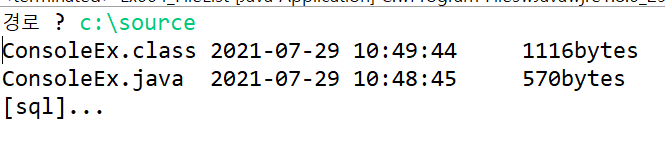
파일은 파일명, 생성날짜, 파일길이를 출력하고

디렉토리는  [ ] 대괄호로 출력한다.


파일 만들기

import java.io.File;

public class Ex005_FileMakeDir {

	public static void main(String[] args) {
		String pathname = "c:"+File.separator+"ex"+File.separator+"test";
		
		try {
			File f = new File(pathname);
			
			if(! f.exists()) {
				f.mkdirs(); // 상위 폴더가 존재하지 않으면 상위 폴더도 생성함
				// f.mkdir(); // 상위 폴더가 존재하지 않으면 폴더를 생성하지 않음
				System.out.println("디렉토리를 생성했습니다.");
			} else {
				System.out.println("존재하는 디렉토리입니다.");
			}
			
		} catch (Exception e) {
			e.printStackTrace();
		}

	}

}

f.mkdirs() 상위 폴더가 존재하지 않으면 상위 폴더도 생성한다. 즉 ex가 없으면 ex도 만들고 test도 만든다.

f.mkdir() 상위 폴더가 존재하지 않으면 폴더를 생성하지 않음. 즉, ex가 없으면 test가 만들어지지 않는다.


파일 이름 변경하기

import java.io.File;
import java.util.Calendar;

public class Ex006_FileRename {

	public static void main(String[] args) {
		String appDir = System.getProperty("user.dir");
		String pathname = appDir + File.separator + "ex.txt";
		
		File f = new File(pathname);
		if(! f.exists()) {
			System.out.println(pathname+" - 존재하지 않음...");
			System.exit(0);
		}
		
		// 확장자(.txt)
		String fileExt = pathname.substring(pathname.lastIndexOf("."));
		
		Calendar cal = Calendar.getInstance(); // 현재 시스템의 날짜/시간을 가지고 있음
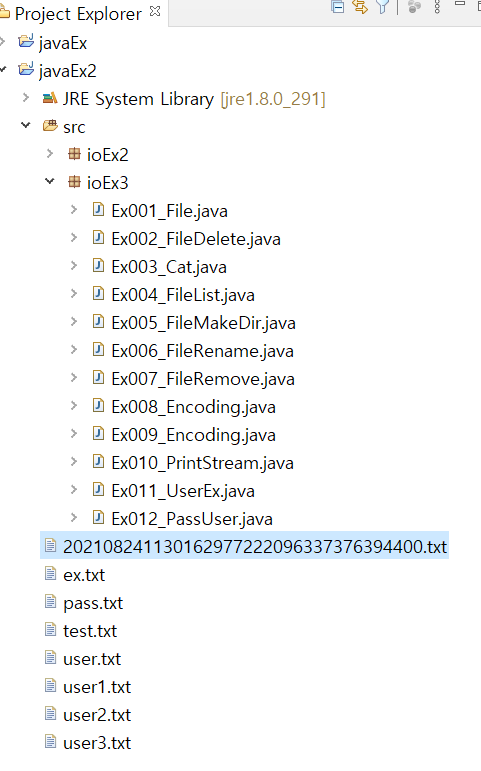
		String newName = String.format("%1$tY%1$tm%1$td%1$tH%1$tM%1$ts",  cal);
		// 1$ 는 첫번째 변수, 
		newName +=System.nanoTime() + fileExt;
		// System.out.println(newName);
		
		try {
			String newFilename = appDir + File.separator + newName ;
			File dest = new File(newFilename);
			
			// 파일 또는 디렉토리 이름 변경
			f.renameTo(dest);
			System.out.println("파일 이름 변경 완료...");
		} catch (Exception e) {
			e.printStackTrace();
		}
		
	}

}

f.renameto(File dest); 파일 또는 디렉토리 이름을 변경해준다.


확장자가 변경되면 안되므로 substring을 통해 마지막 . 뒤에는 따로 저장해 놓는다.

그리고 주고 싶은 이름을 설정하고 확장자를 다시 붙이면 된다.


FileOutputStream

- 데이터를 파일 시스템의 파일에 바이트 스트림으로 저장하기 위해 사용된다.

- OutputStream 클래스의 하위 클래스

- 기본적으로 파일이 없으면 생성하고, 이미 존재하면 그 파일에 덮어씀으로 기존 내용은 사라진다.

import java.io.FileOutputStream;

public class Ex17_FileOutputStream {

	public static void main(String[] args) {
		String pathname = "test.txt";
		FileOutputStream fos = null;
		int data;
		
		try {
			// fos = new FileOutputStream(pathname);
				// 없으면 만들고, 파일이 존재하면 지우고 새로 만든다.
			
			fos = new FileOutputStream(pathname, true);
				// 없으면 만들고, 파일이 존재하면 기존 파일을 지우지 않고 추가(append)한다.
			
			System.out.println("내용 입력[종료:Ctrl+z]");
			while( (data = System.in.read()) != -1) {
				fos.write(data);
			}
			fos.flush();
		} catch (Exception e) {
			e.printStackTrace();
		} finally {
			if(fos != null) {
				try {
					fos.close();
				} catch (Exception e2) {
				}
			}
		}

	}

}

FileOutputStream(String name); 

name이 없으면 만들고, 파일이 존재하면 지우고 새로 만든다.

FileOutputStream(String name, ture); 

name이 없으면 만들고, 파일이 존재하면 기존 파일을 지우지 않고 추가.

자바로 파일을 복사하는 프로그램을 코딩해보자.


1) 잘못된 예

import java.io.BufferedReader;
import java.io.FileInputStream;
import java.io.FileNotFoundException;
import java.io.FileOutputStream;
import java.io.IOException;
import java.io.InputStreamReader;

public class FileCopyEx1 {

	public static void main(String[] args) {
		BufferedReader br = new BufferedReader(new InputStreamReader(System.in));
		// 키보드로 입력을 받는다.
		String source, dest;
		
		FileOutputStream fos = null;
		FileInputStream fis = null;
		
		try {
			System.out.print("복사할 원본 파일명 ? ");
			source = br.readLine();
			
			System.out.print("복사시킬 대상 파일명 ? ");
			dest = br.readLine();
			
			fis = new FileInputStream(source);
			fos = new FileOutputStream(dest);
			
			// 잘못 코딩한 예 - 서울에서 부산을 걸어서 가는 꼴
			int data;
			while( (data = fis.read()) != -1) {
				fos.write(data);
			}
			fos.flush();
			System.out.println("파일 복사 완료...");
		} catch (FileNotFoundException e) {
			e.printStackTrace();
		} catch (IOException e) {
			e.printStackTrace();
		} finally {
			if ( fis != null) {
				try {
					fis.close();
				} catch (Exception e2) {
				}
			}
			if ( fos != null) {
				try {
					fos.close();
				} catch (Exception e2) {
				}
			}
		}
		
		
	}

}


2) 효율적인 방식

import java.io.BufferedReader;
import java.io.FileInputStream;
import java.io.FileNotFoundException;
import java.io.FileOutputStream;
import java.io.IOException;
import java.io.InputStreamReader;

public class FileCopyEx2 {

	public static void main(String[] args) {
		BufferedReader br = new BufferedReader(new InputStreamReader(System.in));
		// 키보드로 입력을 받는다.
		String source, dest;
		
		FileOutputStream fos = null;
		FileInputStream fis = null;
		
		byte[] b = new byte[4096];
		int len;
		
		try {
			System.out.println("파일 복사...");
			
			System.out.print("복사할 원본 파일명 ? ");
			source = br.readLine();
			
			System.out.print("복사시킬 대상 파일명 ? ");
			dest = br.readLine();
			
			fis = new FileInputStream(source);
			fos = new FileOutputStream(dest);
			
			long s = System.currentTimeMillis();
			// len = fis.read(b) => 최대 바이트배열 b길이 만큼 읽어 b에 저장하고
			// 실제로 읽어 들인 byte수를 반환
			while( (len = fis.read(b)) != -1) {
				fos.write(b, 0, len); // b배열의 0번째 인덱스부터 len개 저장
			}
			fos.flush();
			long e = System.currentTimeMillis();
			
			System.out.println("파일 복사 완료..." + (e-s)+"ms");
		} catch (FileNotFoundException e) {
			e.printStackTrace();
		} catch (IOException e) {
			e.printStackTrace();
		} finally {
			if ( fis != null) {
				try {
					fis.close();
				} catch (Exception e2) {
				}
			}
			if ( fos != null) {
				try {
					fos.close();
				} catch (Exception e2) {
				}
			}
		}
		
		
	}

}

ABCDEF 가 파일에 있어서 이 문자들을 읽어서 다른 파일에 붙일때, A를 읽으면 다시 A를 읽지 않는다. 

읽은 것은 다시 읽지 않는다! 그래서 배열에 인덱스 없이도 알아서 다 들어갔다가 다음 배열에 또 들어가고 그렇게 되는 것이다.

FileInputStream 클래스

- 파일 시스템의 파일로 부터 파일 내용을 바이트 스트림으로 읽어 들이기 위해 사용된다.

- InputStream 클래스의 하위 클래스

- 파일이 존재하지 않으면 FileNotFoundException 예외가 발생

import java.io.FileInputStream;
import java.io.FileNotFoundException;
import java.io.IOException;

public class Ex13_FileInputStream {

	public static void main(String[] args) {
		String pathname = "test2.txt";
		int data;
		FileInputStream fis = null;

		try {
			fis = new FileInputStream(pathname);
				// FileInputStream : 파일 입력 byte 스트림
				// 만약 파일이 존재하지 않으면 fileNotFoundException 발생
			
			// FileNotFoundException < IOException < Exception
			System.out.println(pathname+" 파일 내용...");
			
			while( (data = fis.read()) != -1) {
				// 파일에서 읽은 내용을 화면에 출력
				System.out.write(data);
			}
			System.out.flush();
		} catch (FileNotFoundException e) {
			// 파일이 존재하지 않는 경우
			// e.printStackTrace();
			System.out.println(pathname + "는/은 존재하지 않는 파일 입니다.");
		} catch (IOException e) {
			e.printStackTrace();
		} finally {
			if(fis != null) {
				try {
					fis.close();
				} catch (Exception e2) {
				}
			}
		}
	}

}

위와 같은 의미

import java.io.FileInputStream;
import java.io.FileNotFoundException;
import java.io.IOException;

public class Ex14_FileInputStream {
	public static void main(String[] args) {
		String pathname = "text.txt";
		int data;
		
		try(FileInputStream fis = new FileInputStream(pathname)) {
			System.out.println(pathname + "파일 내용...");
			while ( (data = fis.read()) != -1) {
				System.out.write(data);
			}
			System.out.flush();
		} catch (FileNotFoundException e) {
			System.out.println(pathname+"은/는 존재하지 않는 파일 입니다.");
		} catch (IOException e) {
			e.printStackTrace();
		}
	}
}

FileInputStream(String name) 주어진 이름의 파일을 바이트 스트림으로 읽기 위한 FileInputStream 객체를 생성하는 메소드.

2021.08.24 - [쌍용강북교육센터/8월] - 0823_Java : FileOutStream 클래스 에서 저장한 파일을 읽어와 보았다.

FileOutStream 클래스

- 데이터를 파일 시스템의 파일에 바이트 스트림으로 저장하기 위해 사용된다.

- OutputStream(바이트 스트림) 클래스의 하위 클래스

- 기본적으로 파일이 없으면 생성하고, 이미 존재하면 그 파일에 덮어 씀으로 기존 내용은 사라진다.


import java.io.FileOutputStream;
import java.io.IOException;

public class Ex11_FileOutputStream {

	public static void main(String[] args) {
		String pathname = "test.txt";
		// 파일에 내용을 저장하는 byte 스트림
		FileOutputStream fos = null; // 메모리할당을 받지 않음.
		// 쓰레기를 가지고 있음.
		// 초기화되어있지 않아서. ex; int a; 
		int data;
		
		try { // 이 블록은 무조건 실행하는 것은 아님
			fos = new FileOutputStream(pathname); // 메모리할당받음
				// 해당 파일이 없으면 생성하고, 존재하면 삭제하고 만듦.
			System.out.println("문자열 입력[Ctrl+Z:종료]");
			while( (data = System.in.read()) != -1) {
				fos.write(data);
			}
			fos.flush();
			System.out.println("파일 저장 완료...");
			
		} catch (IOException e) {
			e.printStackTrace();
		} finally {
			if(fos != null) { // 메모리할당되어있으면 닫아야함.
				try {
					fos.close(); // 리소스를 닫아주어야 에러가 생기지 않음.
				} catch (Exception e2) {
				}
			}
		}
		
	}

}

위와 같은 의미

import java.io.FileOutputStream;
import java.io.IOException;

public class Ex12_FileOutputStream {

	public static void main(String[] args) {
		String pathname = "test.txt";
		int data;
		
		// JDK 7.0부터 가능 자동 close
		try (FileOutputStream fos = new FileOutputStream(pathname)) {
			System.out.println("문자열 입력[종료:ctrl+z]");
			
			while( (data = System.in.read()) != -1) {
				fos.write(data);
			}
			fos.flush();
			System.out.println("파일 저장 완료...");
		} catch (IOException e) {
			// ctrl+shift+o : 자동 import
			e.printStackTrace();
		}

	}

}

try( 리소스 객체 생성) 하게 되면 자동으로 close 해주기 때문에 따로 finally 에서 문자열입력을 받았으면 (객체가 생성되었으면) 닫는 부분의 코딩을 안해도된다.

키보드로 입력한 값을 1byte씩 읽고 1byte씩 파일에 넣기 때문에 문자가 잘 들어가진다.


FileOutputStream(String name) 주어진 이름의 파일을 바이트 스트림으로 쓰기 위한 FileOutputStream객체를 생성한다. 


BufferedReader 는 문자 입력 스트림을 처리하는 클래스이다.

버퍼를 활용하여 입력 속도를 향상시키고 한줄씩 입력이 가능하다.

]

import java.io.BufferedReader;
import java.io.IOException;
import java.io.InputStreamReader;

public class Ex10_BufferedReader {

	public static void main(String[] args) {
		// BufferedReader : 문자 입력 스트림
		// 	 버퍼를 활용하여 입력 속도 향상
		// 	 한줄씩 입력 가능
		
		BufferedReader br = new BufferedReader(new InputStreamReader(System.in));

		try {
			String name, s;
			int age;
			
			System.out.print("이름 ? ");
			name = br.readLine();
			
			System.out.print("나이 ? ");
			age = Integer.parseInt(br.readLine());
			
			s = age >= 19 ? "성인" : "미성년자";
			
			System.out.println(name+ "님은 " + s + "입니다.");
			
		} catch (NumberFormatException e) { // unchecked 예외
			System.out.println("나이는 숫자만 입력 가능합니다.");
		} catch (IOException e) {
			e.printStackTrace();
		} 
		
	}

}

BufferedReader가 문자 입력 스트림을 처리하기 때문에 문자 입력 스트림인 InputStreamReader의 객체생성을 통해 객체를 만듦.


age 의 경우 readLine을 통해 입력 받은 String을 int형으로 변환해서 넣어준다.


한 줄씩 처리하기 때문에 훨씬 입력 속도가 향상된다.

문자 스트림 

- 2바이트(16bit)의 유니코드(Unicode) 문자를 입출력하기위한 스트림이다.

- 문자 단위로 입출력을 수행한다.

- 모든 문자 스트림 클래스는 Reader 및 Writer 클래스의 서브 클래스이다.

Bridge Stream

- 1byte stream을 2byte stream으로 변환해주는 stream이다.

- Bridge Stream에는 InputStreamReader 와 OutputStreamWriter 클래스가 있다.


Reader 클래스는 문자 입력을 위한 추상 클래스로, 모든 문자 입력 스트림의 최상위 클래스이다.

import java.io.InputStreamReader;
import java.io.Reader;

public class Ex08_Reader {

	public static void main(String[] args) {
		int data;
		char ch;
/*
 		Reader : 문자 입력 스트림. 추상 클래스 
 		InputStreamReader : byte 스트림을 문자 스트림으로 변환(bridge stream)
 */
		
		try {
			Reader rd = new InputStreamReader(System.in);
			
			// "ABC엔터" 입력 : 65 66 67 13 10
			// "대한엔터" 입력 : 45824 54620 13 10
			// 영어 한글 모두 한번에 한문자씩 입력
			
			
			System.out.println("입력[ctrl+z:종료]");
			while( (data = rd.read()) != -1) {
				// System.out.println(data);
				ch = (char) data;
				// System.out.write(ch);
					// 한글깨짐. 2byte 문자를 1byte만 출력하므로 
				System.out.print(ch);
			}
			
		} catch (Exception e) {
			e.printStackTrace();
		}

	}

}

문자 스트림을 입출력하기 위한 Bridge Stream 인 InputStreamReader를 추상 클래스인 Reader 로 업캐스팅 함. read() 입력한 값이 없을때까지 출력. ( -1 이 파일 끝 더이상 읽을 것이 없을때의 값)

 다른 포스팅에서는 read()가 1바이트씩 읽는 메소드였으나 (InputStream과 OutputStream에서는 바이트 스트림이기 때문에 1바이트만 읽음) 하지만 문자 스트림에서는 (Reader) 단일 문자를 읽으므로 2바이트를 읽는다. 따라서 2바이트를 data에 넘겨주고, ch로 강제 형변환 하고 write(ch)로 출력하면 한글은 2바이트 이기 때문에 깨진다.

대한 을 입력하면 문자 '대'를 data에 넘겨주고 그 대에 해당하는 ASCII 코드 값이 ch에 저장되고 ch(2바이트)를 출력할 때 write() 메소드는 1byte만 출력하므로 깨져서 나온다.


따라서 print(ch); 메소드로 출력해야 한다. 

PrintStream

- System.out은 PrintStream의 객체이다.

- 다른 출력 스트림의 기능을 추가하여 다양한 데이터 값의 표현을 편리하게 출력한다.

- 다른 출력 스트림과는 다르게 IOException이 발생하지 않는다.

- 자동으로 flush()가 되도록 생성할 수 있다. 자동으로 플래시 되는 경우, println() 메소드나 개행 문자, 또는 byte(\n)에 의해 자동으로 flush() 메소드가 호출된다.

- 인코딩을 설정하지 않으면 디폴트 문자 인코딩을 사용해 바이트로 변환한다.

- OutputStream, FilterOutputStream 클래스의 하위 클래스이다.

public class Ex07_PrintStream_write {

	public static void main(String[] args) {
		// System.out : PrintStream 객체
		// PrintStream : 다양한 출력이 가능한 출력 스트림(필터 스트림)
		//		IOException이 발생되지 않음.

		System.out.write(65); // 하위 1byte를 출력 버퍼로 보냄
		System.out.write(65);
		System.out.write(65);
		
		System.out.flush(); // 출력 버퍼의 내용을 출력 장치로 보냄
	}

}

InputStream과 OutputStream은 checked Exception이 존재하기 때문에 try ~ catch 를 사용해야 에러가 뜨지 않았지만, PrintStream은 try ~ catch 없이 사용이 가능하다.


import java.io.PrintStream;

/*
 - PrintStream 클래스
   System.out은 PrintStream 객체
   다른 출력 스트림의 기능을 추가하여 다양한 데이터 값의 표현을 편리하게 출력
   IOException 발생하지 않는다. 
   자동으로 flush()가 되도록 생성할 수 있다.
   
 */
public class Ex010_PrintStream {
	public static void main(String[] args) {
		String name = "홍길동";
		int kor = 80;
		int eng = 90;
		int mat = 100;

		// String => byte[]
		// byte[] b = name.getBytes();
		
		try (PrintStream ps = new PrintStream("test.txt")) {
			// ps.println(name+"\t"+kor+"\t"+eng+"\t"+mat);
			// ps.printf("%10s %5d %5d %5d",  name, kor, eng, mat);
			
			ps.print("이름:"+name+",");
			ps.print(kor+",");
			ps.print(eng+",");
			ps.print(mat);
			
			System.out.println("파일 저장 완료");
		} catch (Exception e) {
			e.printStackTrace();
		}
		
	}
}

문자와 숫자가 모두 섞여 있지만 (String, int) PrintStream을 통해서 편리하게 출력할 수 있다.

test.txt 에 출력하라는 의미. 실행 후

test.txt 파일이 만들어지고 그 안에 출력되었음을 알 수 있다.


PrintWriter 클래스

- PrintWriter 클래스는 포맷된 오브젝트의 표현을 텍스트 출력 스트림에 출력한다.

- PrintStream에 있는 print메소드가 모두 구현되어 있다. 단, 인코딩 되지 않은 바이트 스트림을 사용해야하는 메소드는 포함되어 있지 않다.

- 일부분의 생성자를 제외하고는 예외를 throws 하지 않는다.

- PrintStream 클래스와 다르게 자동 플러시(autoFlush) 활성화된 경우 개행 문자를 출력할 때가 아닌, println(), printf(), format() 메소드가 호출될 때만 자동 플러시된다. print() 메소드 등은 flush() 가 호출되거나 PrintWriter객체가 close()될 때 수행된다.

- Writer 클래스의 하위 클래스이다.

import java.io.PrintWriter;

// PrintWriter : 바이트가 아닌 문자를 출력할 때 사용
public class Ex013_PrintWriter {

	public static void main(String[] args) {
		// PrintStream -> PrintWriter
/*		
		PrintWriter pw = new PrintWriter(System.out);
		pw.print("자바");
		pw.print("오라클");
		pw.println("web");
		pw.flush(); // flush()를 호출하거나 close()해야 출력
*/
		
		// true 옵션을 주면 flush()를 호출하거나 println()을 호출하면 출력
		PrintWriter pw = new PrintWriter(System.out, true);
		pw.print("자바");
		pw.print("오라클");
		pw.println("web");


	}

}


'쌍용강북교육센터 > 8월' 카테고리의 다른 글

0823_Java : Writer 클래스  (0) 2021.08.24
0823_Java : Reader 클래스  (0) 2021.08.23
0823_Java : OutputStream 클래스  (0) 2021.08.23
0823_Java : InputStream 클래스  (0) 2021.08.23
0820_Oracle[PL/SQL] : 예외처리  (0) 2021.08.23

+ Recent posts